STM32_IoT_Metering_Eval_Board
Hola Amigos!!
Welcome you all to Gettobyte platform. I am firmware developer and when I am learning firmware development by interfacing number of sensors and modules that has to be connected with MCU. It becomes headache when it comes to making connections of all sensors, using jumper wires on breadboard to interface all modules which are required. Thus, development this board which has almost all peripherals of STM32 MCU connected to one or other sensor to make different kind of Firmware\’s (via interrupts, DMA or pooling, RTOSes frameworks, Bare-metal or HAL Based and etc.). In short, this board is best for people who wants to learn firmware development and understand all peripherals of the MCU.
What is GB_STM32_EVAL_BOARDV_1?
GB_STM32_EVAL_BOARDV_1 is a Custom Eval Board which is designed based on the SMART Energy Metering application, which has several on-board sensors and modules concentric to metering applications.
GB_STM32_EVAL_BOARDV_1 is also a Custom Eval Board based on STM32F103 MCU, which is designed to get hands on all the basic peripherals of STM32 MCU and learn different frameworks of Firmware Development like RTOS, STM32HAL and Bare Metal Codes.
Features of GB_STM32_EVAL_BOARDV_1?
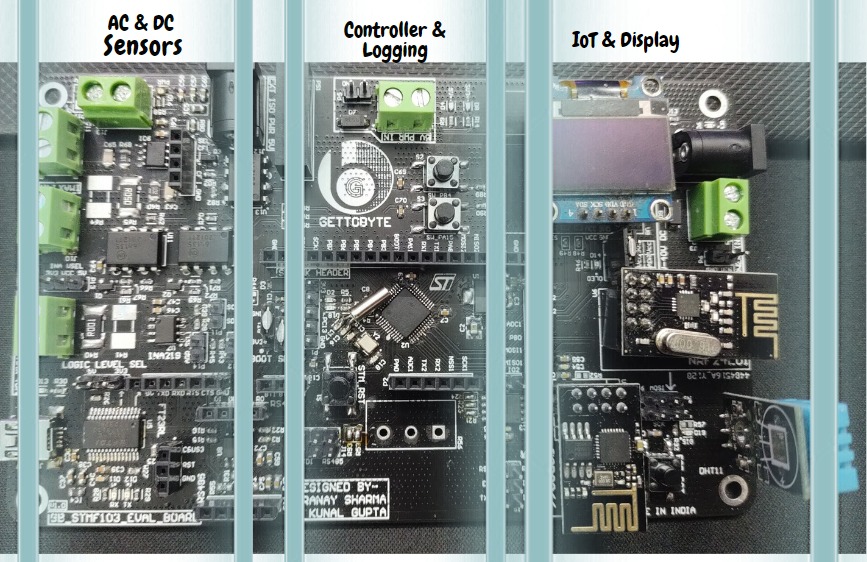
The board is based on SMART Energy Metering application, which has a number of on-board sensors and modules concentric to metering applications. The board has following onboard external components directly connected to STM32MCU via its peripherals.
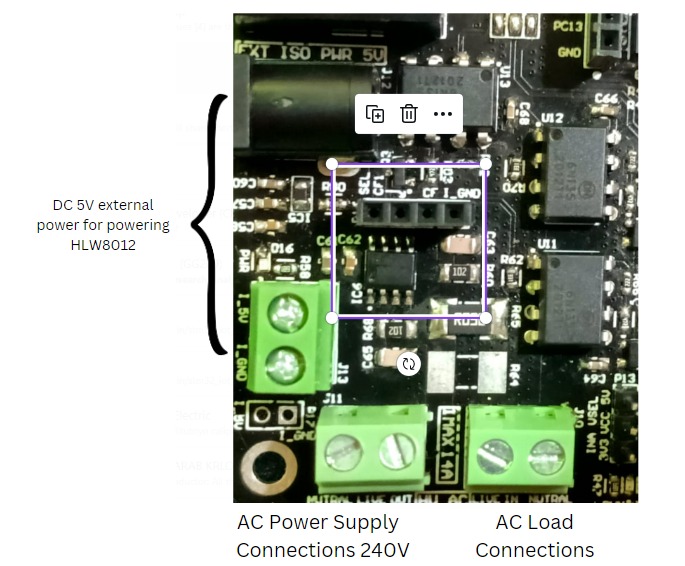
- AC energy metering IC: HLW8012(Timer Input Capture peripheral): AC energy metering IC with 2.5kV galvanic isolation of signal and power fascinated by onboard isolated switch mode DC-DC converter and optocouplers for isolation of signal
- Temperature sensor module: DHT11(Timer peripheral)
- DC energy metering IC: INA219(I2C peripheral)
- OLED graphical Screen: SSD1306(I2C peripheral)
- Wifi Transceiver module: ESP8266(UART peripheral)
- Industrial Communication Protocol Transceiver: RS485( UART peripheral)
- RF transceiver module: NRF24L01(SPI peripheral)
- External Flash Memory IC: W25Q32(SPI peripheral)
- In addition to the above peripherals the board has LEDS & Pushbuttons, to play with GPIO peripheral.
- 10k Ohm potentiometer to get hands on ADC peripheral of STM32 MCU’s.
- The board has breakout pins headed out of all the pins of MCU, for connecting another sensor.
- This board has 0 ohm resistors which act as jumpers. These can be useful while debugging the PCB and also to utilize the pins of the MCU that have been occupied by onboard peripherals.
- The board also has Female-header pins exposed out with each Onboard sensor/module, for connecting the Logic Analyzer to test and debug the working of sensor. Module connected to those pins.
The board can measure AC Ratings upto,
The board can measure DC Ratings upto
It has an on-board data logging feature for 128MB of data, that is approximately 60 days of readings.
Debugger
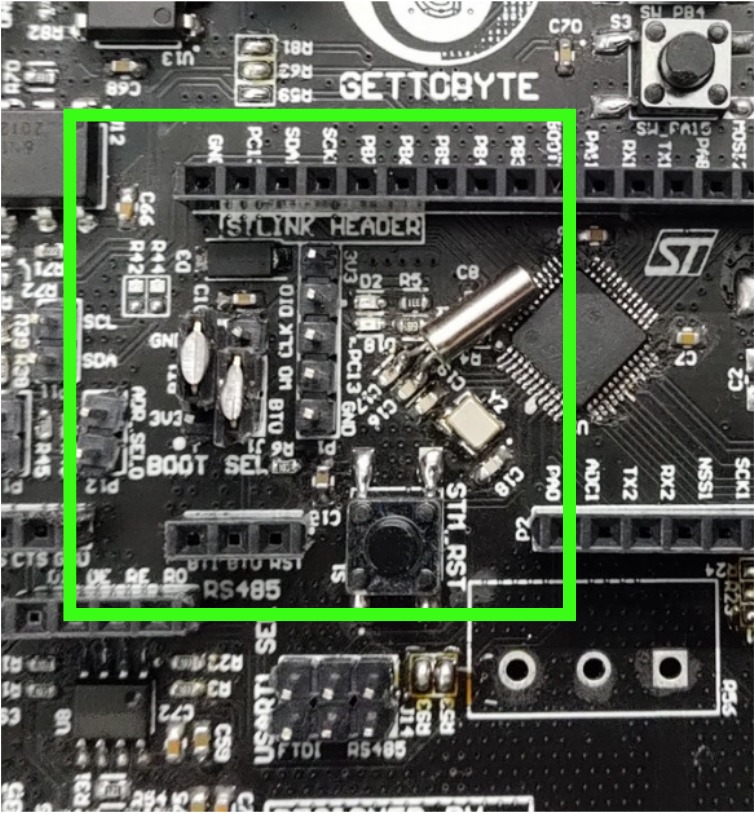
The board can be programmed and debugged via STLINKV2 debugger externally. The board has SWD and SWO debugger pins both headed out via on board Header pins, P1 which can be connected to external debugger STLINKV2, as shown below.
Power Supply
The board has number of On-board power supply options.
- It can be powered by DC adaptor of 6V-40V DC.
- It can be powered directly via STLINKV2 also.
- It can be programmed via UART-FTDO connector too

How to get started with the Board?
To get started with the board is quite simple, simply connect the STLINKV2 debugger via its Debugger pins. You can now open the STM32CubeIDE and simply create a new project by selecting MCU as STM32F103C8.
That’s all, just configure the project according to your wish. Now you can program the board according to your wish using different frameworks of Firmware as follows:
- Using Bare Metal Coding, by making device drivers of the peripherals in register level and then using that for Application development. This way is recommended for beginners who want to learn Embedded Firmware Development from scratch.
- Using STM32 HAL, by configuring the firmware of the board via STM32CubeMX. And directly focusing on the Smart Metering Application project development. This way, is recommended for those who wants to do R&D and prototyping for Smart Metering Application, by building different kind of Applications on the board
- Using RTOS, for building of complex applications. The board houses a number of Input/Output sensors and modules. So it is idle to learn RTOSes like FreeRTOS,Mbed RTOS and etc.
- You can program it via STM32CubeMX, configure the project according
Use Cases of Board
- Custom Evaluation board on STM32 MCU For accelerating prototyping and development time.
Board has on board Metering sensors, Display Screen, Wi-Fi module, RF module, external flash memory, Temperature Sensor, ADC module and RS485 port. So that Development team and engineers can test their Firmware\’s directly on EVAL boards for different scenarios and cases, without going on to hustle to mimic the hardware on breadboard and Jumper Wires during POC. - Board can also be used as DIY KIT, by hobbyists, students and makers to learn STM32 MCU.
Eval board has different sensors and modules interfaced to STM32 MCU touching all peripherals of the MCU. Don\’t need to involve in the hustle of interfacing every sensor and module via jumper wires and breadboard. Use of jumper wires and breadboard, makes the circuit too messy and ugly to work on. Thus developed this EVAL board which has quite famous sensors and modules interfaced to STM32 MCU on PCB, to make the different application firmware on different No RTOS or RTOS frameworks.
Board is concentric to Metering Industry.
In Depth Overview
- AC Energy metering IC HLW8012: Connected to MCU via TIMER INPUT CAPTURE. HLW8012 has 3 pins: SEL, CF1 and CF. Which are connected as shown below. It has to be powered externally via 5V DC supply. Also, it is isolated from power supply of the board, as this part of circuit will be having high Electrical voltage. Also, there are test point P16, for debugging and testing the signals of HLW8012 via logic Analyzer or Oscilloscope.

CF1: PB5(T2C2)
CF: PB6(T4C1)
SEL: PB7(GPIO)
- DC Energy metering IC INA219: Connected to MCU via I2C1 of MCU.

SCL: PB8
SDA: PB9
W25Q128JV SPI flash memory: Connected to MCU via SPI1.
CS:PA4
MISO(DO):PA6
MOSI(DI):PA7
SCK: PA5
- NRF24L01 RF Transceiver chip: Connected to MCU via SPI2
CS: PB12
MOSI: PB15
MISO: PB14
SCK: PB13
CSN:PA12
IRQ:PA11
- SSD1306 OLED Screen: Connected to MCU via I2C2
SCL: PB10
SDA: PB11
- DHT11 temperature sensor: Connected to MCU via Timer Peripheral PB0 pin:
- ESP8266 Wifi Module: Connected to MCU via UART2.
TX:PA2
RX:PA3
- STLINK V2 Debugger: SWIO, SWCLK, SWO pins
SWDIO:PA13
SWCLK:PA14
TRACE-SWO: PB3
- Analog Modules: Connected to ADC peripheral of MCU.
Analog input potentiometer: PA1
Analog input LDR/PT1000: PB1
If anyone interested to buy this out, they can reach out to us for more info by emailing us at gettobyte@gmail.com.
Follow @gettobyte
Related Blogs
Author


